How to Set up an Android Development Environment


Now select all the listed plug-ins using Select All button and click Next button which will guide you ahead to install Android Development Tools and other required plugins.
 If your AVD is created successfully it means your environment is ready for Android application development. Better you re-start your machine and once you are done with this last step, you are ready to proceed for your first Android example but before that we will see few more important concepts related to Android Application Development, in our next tutorial named: What is Android Architecture?
This tutorial has been written with an aim to teach you Set up an Android Development Environment. #Some of Stats/Info mentioned in this post are taken from Wikipedia. They are subjected to changes as android technology is growing very fast.
Hello Guys,
Welcome back to my second tutorial on android application development series as promised in last tutorial, we will take a look at Ho to set up an android development environment.
Android is based on the Java development language and any beginner-level Java developer can jump right in and start developing applications.
The purpose of this guide is to outline in detail the steps necessary to set up the initial development environment for creating Android applications. The guide will address the installation of the Android Software Development Kit (SDK) and the initial set-up necessary for allowing Android OS emulation.
Most preferred operating systems which are used for development:
- Microsoft Windows XP or later version.
- Mac OS X 10.5.8 or later version with Intel chip.
- Linux including GNU C Library 2.7 or later.
- Java JDK5 or JDK6
- Android SDK
- Eclipse IDE for Java Developers (optional)
- Android Development Tools (ADT) Eclipse Plugin (optional)
Steps:
1. Download an IDE:
For the purpose of this example, will be using Eclipse. You can download the latest version of the software here: http://www.eclipse.org/downloads/packages/release/indigo/r.
You must choose the version that corresponds to your OS of choice. Install Eclipse. Make sure to take note of the installation directory and workspace for later reference.
You must choose the version that corresponds to your OS of choice. Install Eclipse. Make sure to take note of the installation directory and workspace for later reference.
2. Download and install the Java Runtime Environment (JRE).
You can find the download file here: http://www.oracle.com/technetwork/java/javase/downloads/jre-6u25-download-346243.html.3. Install the Android SDK:
- The SDK starter package includes the Android SDK and AVD Manager. This is a tool that we will now use to download some required SDK components into our development environment.
- The starter package we downloaded only contains the newest version of the SDK tools. In order to develop Android applications, we will need to download at least one Android platform so we can emulate a phone/tablet via our computer hardware.
- In the root of the SDK directory, find and execute the SDK Manager.exe file. Note: Right-click and run as administrator to avoid any permission declination.
4. Download and Install the Android Development Tools (ADT) plugin for Eclipse
- Google provides a custom plugin for Eclipse, called ADT, that aids developers in creating Android applications faster and more efficiently.
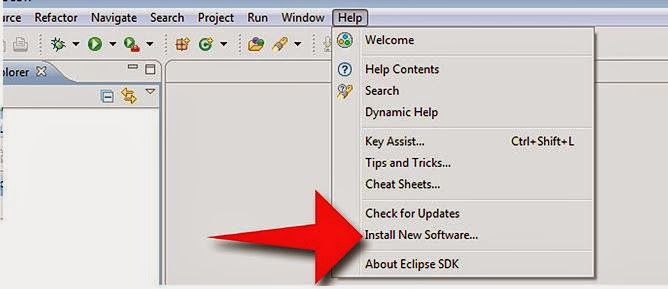
- Open Eclipse and select Help and Install New Software
- Click Add
- In the pop-up dialog, type 'ADT Plugin' in the Name field and enter the following URL in the location field: https://dl-ssl.google.com/android/eclipse/
Now select all the listed plug-ins using Select All button and click Next button which will guide you ahead to install Android Development Tools and other required plugins.
5 - Create Android Virtual Device
Well last to test your Android applications you will need a virtual Android device. So before we start writing our code, let us create an Android virtual device. Launch Android AVD Manager using Eclipse menu options: Window > AVD Manager> which will launch Android AVD Manager. Use New button to create a new Android Virtual Device and enter the following information, before clicking Create AVD button.This tutorial has been written with an aim to teach you Set up an Android Development Environment. #Some of Stats/Info mentioned in this post are taken from Wikipedia. They are subjected to changes as android technology is growing very fast.
.


It's interesting that many of the bloggers your tips helped to clarify a few things for me as well as giving... very specific nice content.|Android Training institute in chennai with placement | Best Android Training in velachery
ReplyDeleteThe blog gave me idea to setup android development environment my sincere thanks for sharing this post and please countinue to share this kind of post
ReplyDeleteAndroid Training in Chennai
Thanks for give the step by step instruction for developing the android.MY sincere thanks for sharing this kind of nice artical. If you are interest to learn Android developement.
ReplyDeleteRefer:
Android Training in Chennai
welcome
Deletethanks
ReplyDeleteNice post ! Thanks for sharing valuable information with us. Keep sharing..Azure Online Training
ReplyDeleteTHIS IS AN AMAZING BLOG TO READ AND I MAKE USE OF IT
ReplyDeleteAzure Training in Chennai | Certification | Azure Online Training Course | Azure Training in Bangalore | Certification | Azure Online Training Course | Azure Training in Hyderabad | Certification | Azure Online Training Course | Azure Training in Pune | Certification | Azure Online Training Course | Azure Training | microsoft azure certification | Azure Online Training Course