Monday, February 3, 2014

How to Set up an Android Development Environment

By Admin   Posted at  11:42 AM   Programming Languages 7 comments
How to Set up an Android Development Environment


Hello Guys,
Welcome back to my second tutorial on android application development series as promised in last tutorial, we will take a look at Ho to set up an android development environment.

Android is based on the Java development language and any beginner-level Java developer can jump right in and start developing applications.

The purpose of this guide is to outline in detail the steps necessary to set up the initial development environment for creating Android applications. The guide will address the installation of the Android Software Development Kit (SDK) and the initial set-up necessary for allowing Android OS emulation.

Most preferred operating systems which are used for development:
  • Microsoft Windows XP or later version.
  • Mac OS X 10.5.8 or later version with Intel chip.
  • Linux including GNU C Library 2.7 or later.
Second thing is that all the required tools to develop Android applications are available at free of cost and can be downloaded from the Web. Following is the list of software's you will need before you start your Android application programming.
  • Java JDK5 or JDK6
  • Android SDK
  • Eclipse IDE for Java Developers (optional)
  • Android Development Tools (ADT) Eclipse Plugin (optional)
So let us have a look how to proceed to set required environment.

Steps:

1. Download an IDE:

For the purpose of this example, will be using Eclipse. You can download the latest version of the software here: http://www.eclipse.org/downloads/packages/release/indigo/r.
You must choose the version that corresponds to your
OS of choice. Install Eclipse. Make sure to take note of the installation directory and workspace for later reference.

2. Download and install the Java Runtime Environment (JRE).

You can find the download file here: http://www.oracle.com/technetwork/java/javase/downloads/jre-6u25-download-346243.html.

3. Install the Android SDK:

  • The SDK starter package includes the Android SDK and AVD Manager. This is a tool that we will now use to download some required SDK components into our development environment.
  • The starter package we downloaded only contains the newest version of the SDK tools. In order to develop Android applications, we will need to download at least one Android platform so we can emulate a phone/tablet via our computer hardware.
  • In the root of the SDK directory, find and execute the SDK Manager.exe file. Note: Right-click and run as administrator to avoid any permission declination.


4. Download and Install the Android Development Tools (ADT) plugin for Eclipse

  • Google provides a custom plugin for Eclipse, called ADT, that aids developers in creating Android applications faster and more efficiently.
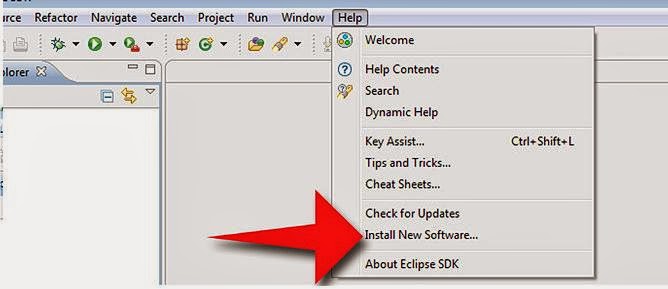
  • Open Eclipse and select Help and Install New Software


Now select all the listed plug-ins using Select All button and click Next button which will guide you ahead to install Android Development Tools and other required plugins.

5 - Create Android Virtual Device

Well last to test your Android applications you will need a virtual Android device. So before we start writing our code, let us create an Android virtual device. Launch Android AVD Manager using Eclipse menu options: Window > AVD Manager> which will launch Android AVD Manager. Use New button to create a new Android Virtual Device and enter the following information, before clicking Create AVD button.
If your AVD is created successfully it means your environment is ready for Android application development. Better you re-start your machine and once you are done with this last step, you are ready to proceed for your first Android example but before that we will see few more important concepts related to Android Application Development, in our next tutorial named: What is Android Architecture?

This tutorial has been written with an aim to teach you Set up an Android Development Environment. #Some of Stats/Info mentioned in this post are taken from Wikipedia. They are subjected to changes as android technology is growing very fast.
.

Thursday, January 30, 2014

Android Application Programming Overview

By Admin   Posted at  1:52 PM   Programming Languages 2 comments

Hello Guys,
Welcome to my first tutorial on android application programming. First lets see a quick overview of android itself, then we'll move on to necessary environmental setup. So without wasting our time lets dig in it, here we go:

What is Android?


Android is an operating system based on the Linux kernel, and designed primarily for touchscreen mobile devices such as smartphones and tablet computers. Initially developed by Android, Inc., which Google backed financially and later bought in 2005, Android was unveiled in 2007 along with the founding of the Open Handset Alliance: a consortium of hardware, software, and telecommunication companies devoted to advancing open standards for mobile devices. The first publicly available smartphone running Android, the HTC Dream, was released on October 22, 2008.

It is world's most popular mobile OS:
Android powers more than a billion phones and tablets around the world. It’s customizable, yet easy to use, and since it's made by Google, it works seamlessly with all your favorite Google apps.

Open Source:
Android offers a unified approach to application development for mobile devices which means developers need only develop for Android, and their applications should be able to run on different devices powered by Android. The source code for Android is available under free and open source software licenses. Google publishes most of the code under the Apache License version 2.0 and the rest, Linux kernel changes, under the GNU General Public License version 2.

Features of Android:

Following is a list of features in the Android operating system:


Android Applications:

Android has a growing selection of third party applications, which can be acquired by users either through an app store such as Google Play or theAmazon Appstore, or by downloading and installing
the application's APK file from a third-party site.
The Play Store application allows users to browse, download and update apps published by Google and third-party developers, and is pre-installed on devices that comply with Google's compatibility requirements. The app filters the list of available applications to those that are compatible with the user's device, and developers may restrict their applications to particular carriers or countries for business reasons. Purchases of unwanted applications can be refunded within 15 minutes of the time of download, and some carriers offer direct carrier billing for Google Play application purchases, where the cost of the application is added to the user's monthly bill. As of July 2013, there are more than one million applications available for Android in the Play Store.

So guys this is my very first post on Android Application Programming and Overview of Android OS.
This tutorial has been written with an aim to teach you how to develop and package Android application. I'll start from environment setup for Android application programming and we will also see How to configure Eclips IDE for the same.
#All Stats mentioned in this post are taken from Wikipedia. They are subjected to changes as android technology is growing very fast.

Wednesday, January 29, 2014

10 Tricks to Boost Your Productivity While Using Eclipse IDE

By Admin   Posted at  9:38 AM   HowTo 8 comments
Hi guys,
Lets see 10 tricks that I find out
as cited on eclipsesource.com to Boost Your Productivity While Using Eclipse IDE, which  are worth sharing with you folks.


What I felt from my personal experience is that those who have just begun using Eclipse or have had “some experience” have used Eclipse only as a text editor or handled it in a really heavy way. The main issue being that they have not yet learned about Eclipse’s capabilities and how to utilize its strong features.

So
here are the top ten things, which will make your programming life a lot simpler and increase your productivity.

1. Letting Eclipse do the typing - A great IDE must assist the developer in writing his code quite instantaneously. Eclipse does this using Refactoring's, Quick Fixes, Code Assist/Code completion and more.  

2. Type Filters (for PDE / RCP developers) - Type Filters take out suggestions for certain types (e.g. classes, interfaces) from the “Open Type” dialog, content assist and quick fix proposals. As an RCP/SWT developer you would not want suggestions for Swing components like Button, Label, etc. You can find this setting in: Preferences > Java > Appearance > Type Filters

3. Text File Encoding - The default setting for saving files in the Eclipse workspace is through the useof file encoding of the underlying operating system. But you generally want to make a platform independent application. For accommodating this, set the file encoding to UTF-8. Using UTF-8 will prevent problems with special characters if deployed to a system running a different OS, running your build on a UNIX machine or in case someone else works on the code by using a different OS.

4. Save automatically before build - One thing I noticed is that people (including me) are constantly hitting Ctrl+S to save or even worse — grabbing the mouse to hit the Save action in the toolbar. This behavior seems to originate from experiences where an application was started from the workspace without saving and of course, changes were then lost. You can save some keystrokes and mouse clicks by enabling Save automatically before build. This is in: Preferences > General > Workspace


5. Use “Step Filtering” for Debugging – Using “Step Filters” you can filter out types you do not want to see, or step through while debugging. This assists you in staying focused on the actual code and does not expose you to the inner workings where you may not have the source.
6. Always launch the previously launched application - This option is for ensuring that your last launched configuration is utilized. Mentioned in the default setting, Eclipse strives to determine the most appropriate configuration for the currently selected resource that can be quite irksome. Set this under: Preferences > Run/Debug > Launching

7. Storing Your Launch Configuration in a Project – A great deal of time is invested in creating a launch configuration. It can be stored as a file in one of your projects. This allows you to share it with colleagues and save them from reinventing the wheel. You can find it in preference in: Menu: Run > Run Configurations... > Launch Configuration Tab: Common

8. Making a Launch Configuration always appear in the Menu – In case you have various Launch Configurations, you can select your favorite ones and stick them permanently to your Launch/Debug menu. You can go to - Menu: Run > Run Configurations... > Launch Configuration Tab: Common

9. Organising imports on save - The imports are instantly added to the class file. However, changing or removing code might make some imports useless. To fix that, you can Organize Imports by pressing shift+crtl+o or shift+cmd+o on a Mac and your imports will be cleaned up. You can also enable Organize imports on save and Eclipse will take care of it instantly. This can be found in: Preferences > Java > Editor > Save Actions
10. Formatting edited lines on save - The code formatter in Eclipse is quite a handy feature ensuring the code appears consistent in your projects irrespective of who has written it. It can also be easily read and understood by anybody. However, formatting the entire file can mess up the difference between two versions of the file. You can find this in -Preferences > Java > Editor > Save Actions.

Hope these tweaks/tricks will help you improve your productivity with eclipse as it helped me even after roughly 4 years of break.
 
HBK Says, " Happy Codding Have Fun " folks.

Back to top ↑
Connect with Us

WhatsApp Share

What they says

one of the best mobile technology blog

Licencing

© 2013 Andropedia : The Android Fulcrum ™. Distributed By Blogger Themes | WP Mythemeshop Converted by Bloggertheme9
Blogger templates. Proudly Powered by Blogger.